Setting up the desktop
Handling the menu window
When navigating in the Apps menu↑ to the Dashboard Editor, a desktop opens that you can display in full screen mode with  .
.
You view the workspace in various display formats to simulate the view of a finished Dashboard on different output devices:
- Narrow to viewing on mobile devices:
 .
. - Medium for viewing on tablets:
 .
. - Wide for viewing on a desktop:
 .
.
You can clear individual menu windows that are currently not needed (e.g. ‘Favorites‘) via ‘Window‘ to improve usability.
You can freely position the remaining menu panes or re-dock them.
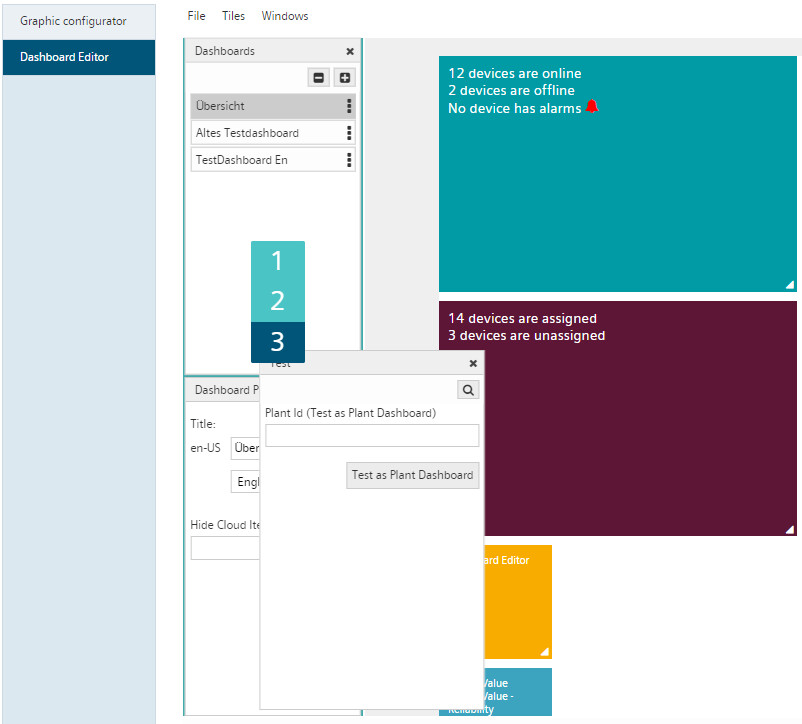
You can sort menu windows in the 'Dock' using the number bar.
'Favorites' menu
The 'Favorites' menu window is the interface for moving and saving data points and tiles between the plant lists, the workspace, and various dashboards. Here:
- Drop data points from the list of plants to the Favorites menu.
- Drop created tiles to the workspace for subsequent reuse.
- Drag tiles to the workspace for use on different dashboards.
For information on how to handle the Favorites menu window, see ‘Create and edit User Dashboards ’.
History menu window
The ‘History’ menu window displays and undoes work steps.
- Perform a work step in the Dashboard Editor.
- A new entry is created.
- For multiple available entries:
- Click one of the previous entries before your last performed work step.
- All subsequent action steps are undone.
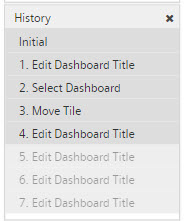
- Perform a new work step.
- The existing entries for the undone operations will be deleted.
- A new entry is created for the newly performed work step.
NOTICE

Loss of existing data
Changes listed in the history are only stored in the browser cache and are lost when you exit the window.
- Save your changes via the 'Save' button or export your work to avoid losing any changes.
Clean up work areas and recreate a dashboard
- Select 'File > New'.
- A new dashboard is created.
- All existing dashboards are deleted from the editor.
NOTICE
Loss of existing data
Export the existing dashboard from the User Dashboard to an external file as a backup copy before creating a new dashboard.
Existing dashboard configurations are lost when running the function 'File > New'.
Additional steps on editing a new dashboard are available 'Create and edit User Dashboards'.
Import function and switching between dashboards
Select 'File > Import' to import an existing dashboard saved to a file that was previously exported to the workspace.
As an alternative, you can import an existing User Dashboard directly from the Dashboard menu to the Dashboard Editor. Select 'File > Import User Dashboard'.
You can also create a dashboard package. It is a group of dashboards that can be imported to an App set.
- Switch between dashboard in 'Window > Dashboard List'.
Save
- Select a dashboard.
- Click the disk icon in the upper right-hand corner to save the dashboard.
- The dashboard is temporarily saved to the browser cache.
Save as User Dashboard
- Select a dashboard.
- Saved the selected dashboard as a User Dashboard via 'File > Save as User Dashboard'.
- The selected User Dashboard can be displayed via 'Dashboard > Overview'.
NOTICE
'Undo' function is unavailable
Ensure that you do not unintentionally overwrite any User Dashboards in 'Dashboard > Overview'. There is no 'Undo' function and the delete is permanent.
Export
- Select an existing dashboard in the Dashboard menu.
- Export the dashboard in 'File > Export'.
- This generates a JSON file and saves it to your default download folder.
Create and archive dashboard packages
When exporting via 'File > Export', ALL dashboards in the Dashboard Editor are automatically exported to the target file. They form a dashboard package.
- Rename the target file identify and reuse your dashboard package.
Select, move, and scale tiles
Select:
- Select individual tiles.
- A small triangle displays in the upper right-hand corner of the tile.
- The tile is switched to enabled.
- Simultaneously select multiple tiles.
- Select two tiles using 'Shift' and mouse click.
- All tiles in between are selected.
- Select two tiles using 'CTRL' and mouse click.
- Only the tiles that have been clicked are selected.
- The select tiles are enabled.
Only in the Favorites menu: Select all tiles
- There are tiles in the Favorites menu.
- Click the icon
 .
.
- All tiles in the Favorites menu are selected.
Move:
- Drag the tile to the desired location.
- The tiles resort with the neighboring tiles based on the target location.
- The tiles do not need to be enabled to move them.
Move to 'Favorites'
- Drag and drop one or more active tiles (See 'Select') to the 'Favorites' menu while holding down the 'CTRL' key.
- The activated tiles are saved under 'Favorites'.
Zoom
- Select the white triangle in the lower right-hand corner of an enabled tile.
- Drag the triangle to the workspace to scale the enabled tile.
- The tile changes size based on the direction.
Edit tiles
Edit individual tiles:
- Select an individual tile.
- Any individual properties can be changed.
- Individual tiles can also be deleted.
- Data point tiles can be assigned with drag-and-drop to a diagram tile.
Edit tile groups:
- Simultaneously select multiple tiles.
- You can change the tile titles and color on all the tiles.
- You can also delete all the tiles.