Create new administrator and assign roles
A Tenant Administrator can create a new administrator for specific roles or function within its tenant area.
The Tenant Administrator invites the new administrator to save the e-mail address to Climatix IC and assign the desired administrator rights to the address. A request to log in to Climatix IC is sent to this e-mail address.
The new administrator role is confirmed and activated by logging in as the new administrator in Climatix IC.
Set up and invite a user as a new administrator
- Own administrator rights are available for the currently set tenant.
- The e-mail address is available for the new administrator.
- Go to 'Administration > Users'.
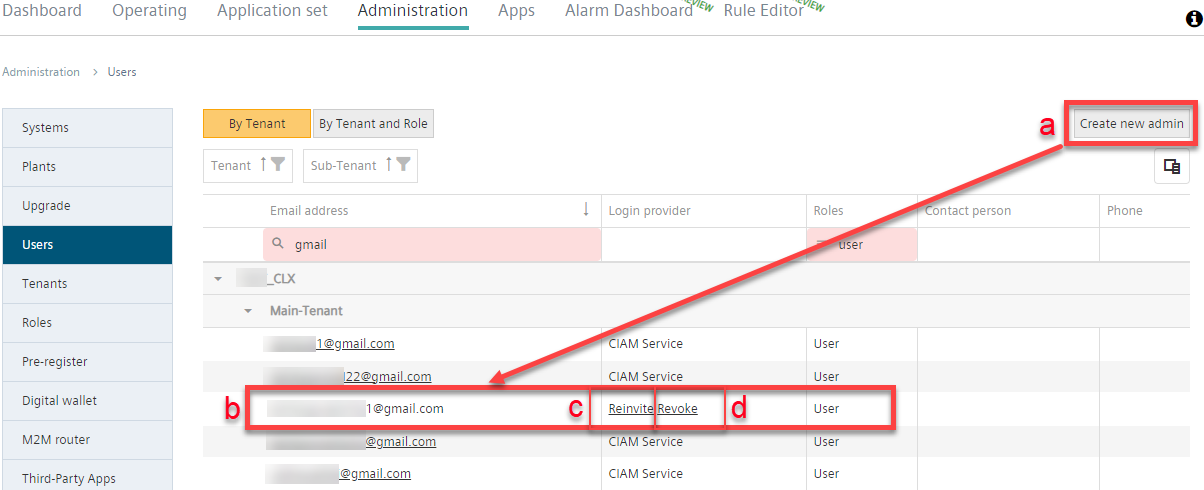
- Select 'Create new admin' (a).
- A new window opens.
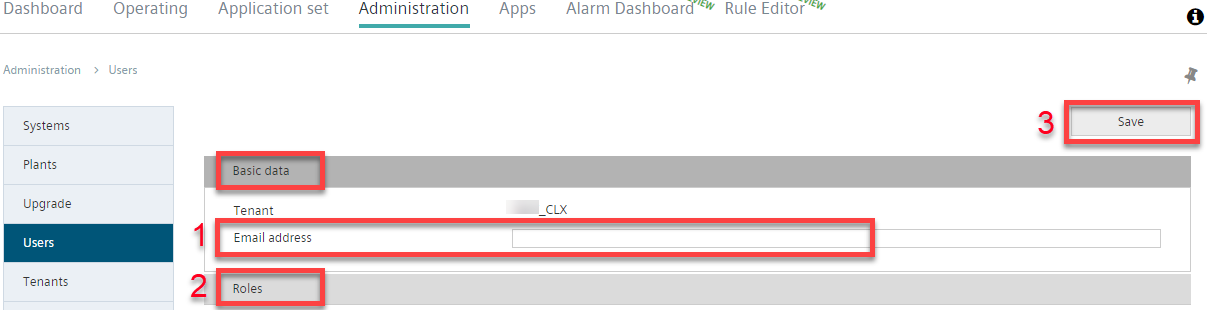
- In 'Basic settings > E-mail address' (1), enter the new administrator's e-mail address.
- In 'Roles' (2), select the rights for the new administrator (See 'Assign administrator roles'.)
- Click 'Save’ (3).
- A new administrator is created and displays in the list of available administrators (b).
- The new administrator has the required rights.
- An e-mail is sent automatically to the e-mail address entered for the new administrator with an invitation to access the tenant in Climatix IC.
- The user must login the first time to change the roles for the new administrator.
Re-invite the new administrator
- A new administrator is set up and the e-mail address displays in the list of available administrators.
- The newly invited administrator has not yet activated the administrator account.
- The column Login Provider displays both options 'Re-invite' and 'Revoke'.
- Select 'Re-invite' (c).
- The window 'Re-send invitation e-mail for user' opens.
- Confirm with 'Yes'.

- The re-invite e-mail is sent to the user’s e-mail address.
Revoke the invitation to the new administrator
- A new administrator is set up and the e-mail address displays in the list of available administrators.
- The newly invited administrator has not yet activated the administrator account.
- The column Login Provider displays both options 'Re-invite' and 'Revoke'.
- Select 'Revoke' (d).
- The window 'Revoke invitation for user’ opens.
- Confirm with 'Yes'.

- The invitation is revoked to Climatix IC for the user.
- The e-mail address for the new user is deleted from the list of tenants.
- The user can log in to Climatix IC.